Adding Pester tests to a PowerShell module and scheduling CI with AppVeyor
Adding Pester tests to a PowerShell module is probably one of the most valuable development activities you'll be able to perform, and I'd encourage you to do it early in your project. I left it until rather late with SQLChecks, and as a result have broken the module several times.
While some of breaks were definitely edge cases (and I don't think I have the the foresight to write a test that would have caught them), one of the most egregious errors caused SQLChecks to not export any functions at all. In this post I'll walk through the steps needed to do just that, which in brief are:
- Create a Pester test for the module
- Run the test locally, demonstrating that it will fail when the module doesn't export any functions
- Schedule the test to run automatically every time a commit is pushed to the GitHub repo (using AppVeyor)
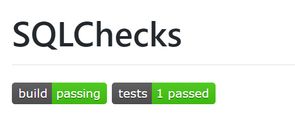
- Display the build status and number of passing tests on the Github readme
And once we're done a quick glance at our readme will show:
Adding a Test
We're going to add the Pester tests to a new tests folder in the root of the repository. The module (including its manifest and all functions) are all in the src/SQLChecks folder.
The goal of our the first test is to ensure that the module exports something - not a big hurdle, but it's a start. The complete SQLChecks.Module.tests.ps1 file looks like this:
Import-Module $PSScriptRoot\..\src\SQLChecks -Force

Describe "Import-Module SQLChecks" {
  Context "Module Exports" {
    It "Should export at least one function" {
      @(Get-Command -Module SQLChecks).Count | Should BeGreaterThan 0
    }
  }
}
We can then verify SQLChecks exports a function by running Invoke-Pester in the tests folder:
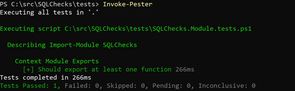
Note that because SQLChecks contains several
.tests.ps1files as embedded resources, running Invoke-Pester from the root folder of the repository will generate a lot of false positives.
Breaking the module
We can also demonstrate what happens when we break our module import process by commenting out the line that dot-sources all of our functions:
$files = Get-ChildItem -Recurse -Filter *.ps1 -Path $PSScriptRoot/Functions

foreach($file in $files) {
    #. $file.FullName # This line shouldn't be commented!
}
Which leads to...

Although this is an extremely simple test we have created a repeatable and easy way to ensure (one form of) correctness. More importantly we've also created a process which anyone contributing to SQLChecks can use to verify they've not made things any worse.
Over time I plan to add more checks that will not only verify correctness, but also check formatting and conventions are being followed.
Now that we have a repeatable way of testing SQLChecks is correct, the next step is to automate that check...
Configuring Continuous Integration
AppVeyor is a continuous integration & continuous deployment service that allows us to react to some or all commits to our repository. We're going to use it to run Pester tests after each commit, though if you browse through the AppVeyor documentation you'll see it is capable of much more (build, test, and deploy software/artifacts).
AppVeyor is free for open source projects, and if you don't already have an account you can sign up for one with your GitHub credentials. From your account home you can create a new project and link it to your GitHub repository - AppVeyor will then start running its default build process every time you commit.
I'm using GitHub, but AppVeyor also supports projects hosted in many other providers - Gitlab, VSTS, and Bitbucket to name a few.
Out of the box AppVeyor doesn't support automatic discovery of Pester tests, so we'll use an appveyor.yml file (placed in the root of our repository) to tell it what pipeline to run after every commit:
- Do nothing if all the files changed are markdown files (
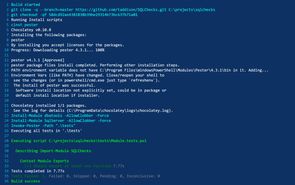
.md) - see commit filtering for more details - Ensure Pester is installed (using Chocolatey)
- Install modules listed as required in the SQLChecks manifest (SqlServer and DBATools)
- Don't run any build step (we have nothing to build)
- Run Invoke-Pester on the folder containing our tests
This looks like this:
skip_commits:
  files:
    - "**/*.md"

install:
  - cinst pester
  - ps: Install-Module dbatools -AllowClobber -Force
  - ps: Install-Module SqlServer -AllowClobber -Force

build: off

test_script:
  - ps: Invoke-Pester -Path .\tests
If we trigger a build (either manually by clicking the 'New Build' button inside your AppVeyor project, or commit a change to the repository) we'll see something like this:
Recording test results in AppVeyor
At this stage the build is still marked as successful even if some tests fail. Build status is dependent solely on the output of each step of the pipeline (if any fail, the build fails). Even if 100% of tests fail, the Invoke-Pester command still completed successfully, and so the build passes. We need to let AppVeyor know one or more tests have failed by causing our test step to fail when tests fail. The Pester wiki has an example script we can use to do just that:
test_script:
  - ps: |
      $testResultsFile = ".\TestsResults.xml"
      $res = Invoke-Pester -OutputFormat NUnitXml -OutputFile $testResultsFile -PassThru
      (New-Object 'System.Net.WebClient').UploadFile("https://ci.appveyor.com/api/testresults/nunit/$($env:APPVEYOR_JOB_ID)", (Resolve-Path $testResultsFile))
      if ($res.FailedCount -gt 0) {
          throw "$($res.FailedCount) tests failed."
      }
By including a throw in our script, we cause the script step to fail, so the whole build will be marked as failed.

The other part of this script (uploading a file with WebClient) takes the results and uploads them to AppVeyor, which means along with each build's status (pass/fail), we also get access to the results of each test. As you can see below, the 'Always Fail' test did indeed fail:
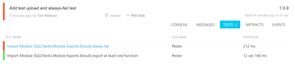
Now that we've got the build status and tests working correctly, we can display them as badges using shields.io (and you can click the badge to view the most recent build/test results):


If you look at the URL you'll see how you can modify them to fit your own project (and if you check the main shields.io page you'll find they support a lot of other badges too).
[](https://ci.appveyor.com/project/taddison/sqlchecks)
[](https://ci.appveyor.com/project/taddison/sqlchecks/build/tests)Next Steps
Once the CI process is in place it only gets more valuable as you increase the number of tests that can be executed for every commit. Some examples of how SQLChecks tests might be enhanced in the near future:
- Check behaviour of commands without needing SQL Server by mocking certain cmdlets (e.g.
Invoke-SqlCmd) - Ensuring code standards are maintained with PSScriptAnalyzer
- Making sure I don't screw up the module manifest
- Ensuring that the 'Config' family of commands all actually accept a Config parameter (see this GitHub issue)
And this is only scratching the surface - a lot of people have spent a lot of time testing pretty much anything with Pester and PowerShell (including things like SQL Server Infrastructure, perhaps with a module like SQLChecks...).