Getting started with Log Analytics and PowerShell logging
Log Analytics is a fantastic place to ship, store, and analyse your logs. Whether they're coming from a linked Azure resource, machine agents, or you're posting them from your own applications and services, Log Analytics is a key part of Azure Management & Monitoring. Whether you're an IT Pro, working in devops, or an application developer - this platform and its capabilities are worth exploring and understanding.
Log Analytics was previously offered as part of the Operations Management Suite (OMS) bundling, though that labelling is in the process of being retired.
To get started you can create a free workspace which lets you ingest up to 5GB of data per month. Once the data is loaded there is no cost to query it, and it'll be retained for 31 days (you can up retention and ingestion limits as part of paid plan later).
This post will walk through creating a Log Analytics workspace, uploading some logs with PowerShell, and then querying them via the portal. To follow along you'll need an Azure subscription and the AzureRM PowerShell module - for installation instructions see the prerequisites section at the end of this post.
Creating the workspace
We'll create the workspace using PowerShell. If you prefer you can create the workspace via the Azure Portal.
To start you'll need to import the AzureRM PowerShell module and connect to your Azure account. If you have more than one subscription you'll need to select the one you want to work with.
Import-Module AzureRm
Connect-AzureRmAccount

# If you have more than one subscription select the one you want to create the workspace in
Get-AzureRmSubscription -SubscriptionName "Sub Name" | Select-AzureRmSubscription
Once connected to a subscription you can create a workspace. The below code creates it in the East US location, though there are a few other regions available. The script below also creates a resource group to store the workspace (though you could also specify an existing resource group).
The resource group name must be unique within your subscription, and the workspace name must be globally (not just your subscription/organisation) unique.
$resourceGroupName = "RG-LogAnalytics-Test"
$location = "eastus"
$workspaceName = "LogAnalyticsTestWorkspace"

New-AzureRmResourceGroup -Name $resourceGroupName -Location $location

$newWorkspaceParams = @{
    ResourceGroupName = $resourceGroupName
    Location = $location
    Sku = "standalone"
    Name = $workspaceName
}

New-AzureRmOperationalInsightsWorkspace @newWorkspaceParams
Note the SKU is actually
PerGB2018- the older SKUs (free, standard, premium, standalone, pernode) aren't supported in subscriptions created after April 2018. You can read more details in the announcement blog post. We specify thestandaloneSKU though it'll actually create withPerGB2018(the AzureRM cmdlets don't yet support thePerGB2018SKU).
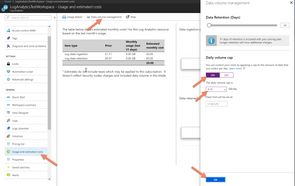
The last thing we'll do is apply a data volume cap to ensure our workspace doesn't exceed the free tier's limit of 5GB/month. Currently this can't be done with a PowerShell cmdlet, so you'll need to use the portal.
The screenshot below shows what this looks like, the steps you need to take from the Log Analytics page are:
- Select the Usage & Billing blade
- Select the Data volume management tab
- Turn the Daily Volume Cap ON
- Set a volume which keeps you within your 5GB/month limit (e.g. 0.15GB/day)
- Press OK to apply the settings
I've opened an issue to request adding support to set daily volume caps in the AzureRM PowerShell module.
Posting data to the workspace
To post data to the workspace you'll need one of the two workspace keys as well as the CustomerId (sometimes called the Workspace Id). You can get this information from the portal, or via PowerShell:
Get-AzureRmOperationalInsightsWorkspaceSharedKeys -ResourceGroupName $resourceGroupName -Name $workspaceName
(Get-AzureRmOperationalInsightsWorkspace -ResourceGroupName $resourceGroupName -Name $workspaceName).CustomerId
To send data to our workspace we're going to use the Log Analytics Data Collector API. This API lets us send a JSON payload which gets logged to a table in of our workspace. We're going to use the Export-LogAnalytics function (available in this GitHub Gist) to send the data.
Our test dataset will be a snapshot of currently running processes, including their name and handle count.
The Export-LogAnalytics function uses ConvertTo-Json to build the JSON payload, which by default attempts to serialize the object with depth 2. By building our own pscustomobject we have fine-grained control over exactly what schema our final table will have (and in most cases you won't want to log every property on the typically data-rich PowerShell objects you are working with).
$processes = Get-Process | ForEach-Object {
    [pscustomobject]@{
        ProcessId = $_.Id
        ProcessName = $_.ProcessName
        Handles = $_.HandleCount
        CollectionTime = [System.DateTime]::UtcNow
    }
}

$logAnalyticsParams = @{
    CustomerId = "From-Earlier-Step..."
    SharedKey = "From-Earlier-Step..."
    TimeStampField = "CollectionTime"
    LogType = "Process"
}

Export-LogAnalytics @logAnalyticsParams $processes
A few things to note:
- The table name is based on the
LogTypeargument, and always has _CL appended (for Custom Log) - Every property will get its own column in the final table, typed as either a string, boolean, datetime, guid, or double
- The column name is suffixed based on the data type -
_dfor double,_tfor datetime, etc. - If TimeStampField isn't specified the time of every record is based on ingestion time, otherwise the TimeGenerated property is set based on the field specified
- In our example TimeGenerated field will contain the value from the CollectionTime property, and CollectionTime will not appear as a field in the table
- If an array of objects are passed to the function, each object is ingested as a separate row
For more information about the Data Collector API check the documentation
Viewing the data
Important note: There can be significant delays between you posting the data and it being available to query. This is known as ingestion delay, and the current SLA is 6 hours. Data typically appears within 10 minutes, and although your custom table (e.g. Process_CL) will appear immediately once you post data, the fields won't appear until the data is ingested. If no rows appear, wait a little while!
Once the data has been ingested you can navigate to the Log Analytics query interface via the Azure Portal (the Logs blade), or you can run the below PowerShell to get a direct link to query your workspace:
$subscriptionId = (Get-AzureRmContext).Subscription.Id
$uri = "https://portal.loganalytics.io/subscriptions/{0}/resourcegroups/{1}/workspaces/{2}" -f $subscriptionId, $resourceGroupName, $workspaceName
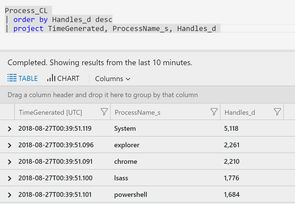
$uriOnce in the query portal you can write a query (if you used the link from PowerShell you'll need to open a new tab). The below example lists processes ordered by the number of handles:
ProcessLog_CL
| order by Handles_d desc
| project TimeGenerated, Handles_d, ProcessName_s
You can also deep-link queries using the URI we built earlier, appending the query you want to run (you'll need to URL encode the query if it contains spaces/line breaks/etc.):
"{0}?query=Process_CL" -f $uriClean-up
If you don't want to keep your workspace around you can tidy up by either removing the whole resource group (which deletes all resources in it), or just the workspace:
# Remove the whole resource group
Remove-AzureRmResourceGroup -ResourceGroupName $resourceGroupName

# Just remove the log analytics workspace
Remove-AzureRmOperationalInsightsWorkspace -ResourceGroupName $resourceGroupName -Name $workspaceName
You can also use the Azure portal to delete either of these.
Next steps
The world is your data-driven oyster now you've got a workspace configured! All you need now is some data - a great way to get started is by connecting your machine to log analytics and shipping some performance counters.
Once you've got some data you'll want to get to grips with the query language of Log Analytics - KQL (Kusto Query Language). This language is making an appearance in more and more products (Application Insights and Windows Defender Advanced Threat Protection are two particularly prominent ones), and is extremely powerful. The documentation home page for Log Analytics is a good place to start, or you can dive straight into the query language reference.
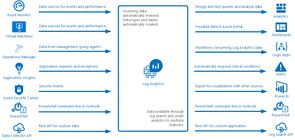
This really is only a small taste of what you can do when you start leveraging Log Analytics as the glue for your monitoring and alerting (which is whole other facet of the product to explore). The below image (taken from Microsoft's Log Analytics overview page) should give you plenty of ideas for how it can be used.
I hope you have as much fun querying your logs as I do!
Prerequisites
You can create a free Azure Subscription if you don't already have one. You'll need a Microsoft Account to do that. The subscription comes with a bunch of services that are free for 12 months, along with some that are free forever (including 5GB per month of Log Analytics).
If you want to use PowerShell to create your workspace and follow along with most of the examples in this post you'll need to install AzureRM PowerShell - the easiest way to do that is to execute the following from an elevated PowerShell prompt:
Install-Module -Name AzureRMFull workspace creation script
The below script creates the resource group, workspace, and then prints the primary & secondary keys, as well as the URI for querying logs. You still need to visit the portal to set a daily cap if you want to avoid any charges.
Import-Module AzureRm
Connect-AzureRmAccount

$subscriptionName = "Tim Addison - MSDN"
Get-AzureRmSubscription -SubscriptionName $subscriptionName | Select-AzureRmSubscription

$resourceGroupName = "RG-LogAnalytics-Test" # subscription unique
$location = "eastus"
$workspaceName = "LogAnalyticsTestWorkspace" # globally unique

New-AzureRmResourceGroup -Name $resourceGroupName -Location $location

$newWorkspaceParams = @{
    ResourceGroupName = $resourceGroupName
    Location = $location
    Sku = "standard"
    Name = $workspaceName
}

New-AzureRmOperationalInsightsWorkspace @newWorkspaceParams

Get-AzureRmOperationalInsightsWorkspaceSharedKeys -ResourceGroupName $resourceGroupName -Name $workspaceName
(Get-AzureRmOperationalInsightsWorkspace -ResourceGroupName $resourceGroupName -Name $workspaceName).CustomerId

$subscriptionId = (Get-AzureRmContext).Subscription.Id
$uri = "https://portal.loganalytics.io/subscriptions/{0}/resourcegroups/{1}/workspaces/{2}" -f $subscriptionId, $resourceGroupName, $workspaceName
$uri
Export-LogAnalytics function
The below script contains the Export-LogAnalytics function and supporting Get-LogAnalyticsSignature function. They are both derived from the examples on the Log Analytics Data Collector API page.
# Adapted from https://docs.microsoft.com/en-us/azure/log-analytics/log-analytics-data-collector-api
Function Get-LogAnalyticsSignature {
    [cmdletbinding()]
    Param (
        $customerId,
        $sharedKey,
        $date,
        $contentLength,
        $method,
        $contentType,
        $resource
    )
    $xHeaders = "x-ms-date:" + $date
    $stringToHash = $method + "`n" + $contentLength + "`n" + $contentType + "`n" + $xHeaders + "`n" + $resource

    $bytesToHash = [Text.Encoding]::UTF8.GetBytes($stringToHash)
    $keyBytes = [Convert]::FromBase64String($sharedKey)

    $sha256 = New-Object System.Security.Cryptography.HMACSHA256
    $sha256.Key = $keyBytes
    $calculatedHash = $sha256.ComputeHash($bytesToHash)
    $encodedHash = [Convert]::ToBase64String($calculatedHash)
    $authorization = 'SharedKey {0}:{1}' -f $customerId,$encodedHash
    return $authorization
}

Function Export-LogAnalytics {
    [cmdletbinding()]
    Param(
        $customerId,
        $sharedKey,
        $object,
        $logType,
        $TimeStampField
    )
    $bodyAsJson = ConvertTo-Json $object
    $body = [System.Text.Encoding]::UTF8.GetBytes($bodyAsJson)

    $method = "POST"
    $contentType = "application/json"
    $resource = "/api/logs"
    $rfc1123date = [DateTime]::UtcNow.ToString("r")
    $contentLength = $body.Length

    $signatureArguments = @{
        CustomerId = $customerId
        SharedKey = $sharedKey
        Date = $rfc1123date
        ContentLength = $contentLength
        Method = $method
        ContentType = $contentType
        Resource = $resource
    }

    $signature = Get-LogAnalyticsSignature @signatureArguments

    $uri = "https://" + $customerId + ".ods.opinsights.azure.com" + $resource + "?api-version=2016-04-01"

    $headers = @{
        "Authorization" = $signature;
        "Log-Type" = $logType;
        "x-ms-date" = $rfc1123date;
        "time-generated-field" = $TimeStampField;
    }

    $response = Invoke-WebRequest -Uri $uri -Method $method -ContentType $contentType -Headers $headers -Body $body -UseBasicParsing
    return $response.StatusCode
}