Better expenses with Monzo and PowerShell
While making submitting expenses fun is probably impossible, we can leverage Monzo and PowerShell to start automating away some of the manual steps involved. In my specific case I need to submit monthly expenses with receipt support and categorise each expense. Combine Monzo's tagging, image support, and CSV export with PowerShell's ability to...well do pretty much anything, and we have a workable solution!
Assuming I've correctly tagged all my transactions with the #expense tag I can then take the monthly export (available from the spending tab) and get my expense submission mostly prepared with a single PowerShell command:
. c:\src\blog-monzo-expenses\Expenses.ps1

$monzoExport = "c:\expenses\monzoexports\March2018.csv"
$exportFolder = "c:\expenses\submissions\March2018"

Export-ExpenseFromMonzo -MonzoExport $monzoExport -ExportFolder $exportFolder
This creates a CSV that contains transactions tagged with #expense in the Monzo account currency, downloads the first image associated with each transaction (and names it to match the line in the CSV), and maps the Monzo category to the internal expense reporting category.
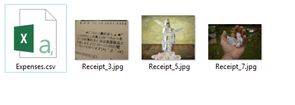
A little copy-paste later and I'm done. Read on for details on how it works, and where you can customise the data you return. If you want to use this on your own data (or try it out on some sample data) you can get everything you need in this example GitHub repo.
How the script works
The script:
- Gets all the entries in the Monzo CSV export
- Filters out anything that doesn't contain the tag #expense
- Downloads the first image for each transaction (if one exists), and renames it to match the expense line (1,2,3...)
- Maps the Monzo category to an internal category
- Writes the expense line to a CSV, including ID, Date, Currency, Amount, Category, and if a receipt is present
Let's go through some of those steps in more detail. First of all - importing the CSV and filtering. A tag in Monzo is stored in the notes field.
$entries = Import-Csv -Path $MonzoExport
$expenseEntries = $entries | Where-Object { $_.notes -like "*#expense*" }
We then iterate over every entry and first of all check to see if there is an image. The Monzo format exports the images in an array in the form [ImageUrl,Image2URL]. We only grab the first image if there is more than one, and save it to disk.
The images are uploaded to S3 buckets with no extension, so we use the content-type to map to the appropriate extension (e.g. image/jpeg -> .jpg). While testing I've used images hosted in GitHub, which don't return a content-type - as such I've added .jpg, which always gets a photo viewer to launch.
$hasReceipt = "No"
$imagePathWithoutExtension = $exportFolder + "\Receipt_$expenseId"
if($expense.receipt -match "\[([^,]+).*\]")
{
    $expenseImage = Invoke-WebRequest -Uri $Matches[1] -OutFile $imagePathWithoutExtension -PassThru
    $extension = Get-ExtensionFromContentType -ContentType $expenseImage.Headers.'Content-Type'
    if($extension -eq $null)
    {
        # It'll get a photo viewer to launch
        $extension = "jpg"
    }
    Rename-Item -Path $imagePathWithoutExtension -NewName "Receipt_$expenseId.$extension"
    $hasReceipt = "Yes"
}
We then add an expense object to an array we'll later export. Whatever properties this object has will end up in the CSV, so if you wanted to add extra data (e.g. the whole notes, the merchant name) this is where you'd do it.
Note that we multiply the amount by -1, as debits (charges) show up as negative amounts in the transaction feed, whereas you'll typically report expenses as a positive amount.
$outExpenses += [pscustomobject]@{
    Id = $expenseId
    Date = [DateTime]::Parse($expense.created).ToString("yyyy-MM-dd")
    Type = Get-ExpenseTypeFromCategory $expense.category
    Currency = $expense.currency
    Amount = ([double]$expense.amount) * -1
    HasReceipt = $hasReceipt
}
Finally we export the CSV into the folder we've been saving the images into.
$outExpenses | Export-Csv -Path "$exportFolder\Expenses.csv" -NoTypeInformationUsing this on your data
The only thing you need to get started with your own data is the Expenses.ps1 file from the sample repo. Modify the PowerShell script below to include:
- The path to your Expenses.ps1 file
- The path to your Monzo CSV
- The folder you want to save the export in
. c:\path\to\Expenses.ps1

$monzoExport = "c:\src\blog-monzo-expenses\Example\March2018Export.csv"
$exportFolder = "c:\temp\expenses\March2018"

Export-ExpenseFromMonzo -MonzoExport $monzoExport -ExportFolder $exportFolder
Hopefully you can see how you can easily take the general idea and customise it to fit whatever process you follow. Some examples of things I've played around with:
- Tags to delineate trips (e.g. #tripNYC)
- Tags to extract extra metadata (e.g. #E-Client-12345)
- Caps (e.g. don't expense more than $50 in food/day)
- Time zone offsets ()
Appendix: Sample Monzo export
id,created,amount,currency,local_amount,,local_currency,category,emoji,description,address,notes,receipt
tx_00001ABCDEFGHIJKLMNOPQ,2018-03-30 17:32:57 +0000,-25,GBP,-25,1,GBP,general,,,,,
tx_00002ABCDEFGHIJKLMNOPQ,2018-03-29 19:33:45 +0000,-20,GBP,-20,1,GBP,general,,,,,
tx_00003ABCDEFGHIJKLMNOPQ,2018-03-29 19:33:06 +0000,-13.3,GBP,-13.3,1,GBP,general,,,,,
tx_00004ABCDEFGHIJKLMNOPQ,2018-03-24 15:21:47 +0000,-5.5,GBP,-5.5,1,GBP,general,,,,,
tx_00005ABCDEFGHIJKLMNOPQ,2018-03-17 11:59:09 +0000,-19.5,GBP,-19.5,1,GBP,groceries,,,,#expense,
tx_00006ABCDEFGHIJKLMNOPQ,2018-03-11 16:11:55 +0000,-67.99,GBP,-67.99,1,GBP,entertainment,,,,#expense,
tx_00007ABCDEFGHIJKLMNOPQ,2018-03-10 01:03:26 +0000,-5.28,GBP,-7.27,1.376893939,USD,shopping,,,,#expense,[https://github.com/taddison/blog-monzo-expenses/raw/master/Example/2327734421_7087f8f47e_z]